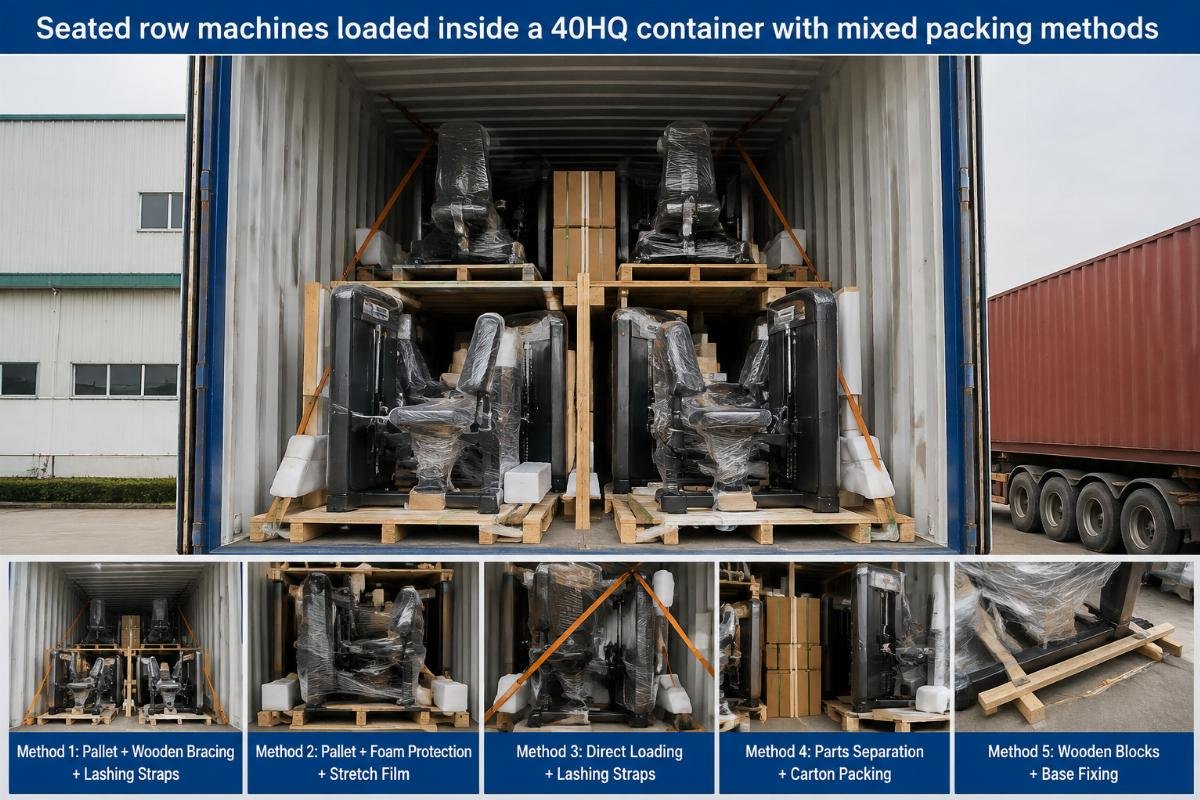

Container Loading Configuration for Multi-Function Smith Machine Bulk Orders
Most importers assume stuffing more units into a container automatically lowers per-unit freight cost — until destination port overweight fines erase every dollar saved.
A standard 40ft high-cube container typically accommodates between twenty-four and thirty fully assembled multi-function Smith machines, or up to forty units when packed in knock-down configuration; however, the real limiting factor is rarely internal volume — it is axle load compliance at the destination port, which forces shippers to leave usable cubic space empty rather than risk customs penalties.
I still remember standing on a dock in Jebel Ali, watching a forklift operator struggle to angle a pallet of Smith machines through a container door that was two centimeters too narrow for the loaded skid. The buyer — a distributor supplying commercial gyms across the Gulf — had specified the largest footprint model in our catalog without checking the door aperture of a standard 40HC. That single oversight meant three units had to be unloaded, repacked flat, and re-stuffed manually, adding days to the schedule and hundreds of dollars in labor. Since then, I have made it a habit to walk every bulk order through a container loading configuration checklist before a single crate hits the production floor. [NEED_CITE: ISO 668 series container internal dimension standards and door aperture specifications]
Getting the container loading configuration right is not just about geometry — it is about understanding how weight, volume, destination regulations, and packing method interact before the container doors seal.
How Many Multi-Function Smith Machines Fit in a 20ft vs 40ft Container?
The short answer is that a 20ft general-purpose container holds roughly six to eight fully assembled multi-function Smith machines, while a 40ft high-cube container holds between twenty-four and thirty — but knock-down packing can push that number substantially higher in both sizes.
The reason the range is so wide comes down to two variables: the base footprint of the specific Smith machine model and whether the unit ships assembled or knocked down. A compact multi-function Smith machine with a relatively small footprint and removable weight horns will pack far more densely than a full commercial-grade unit with integrated cable crossover towers and plate storage. [NEED_CITE: typical base footprint dimensions across commercial Smith machine model categories]
When machines ship fully assembled, the upright frames and guide rails dominate the cubic calculation. You are essentially stacking rectangular prisms with significant dead air space above and between units. In a 20ft container, six to eight units is the practical ceiling before you run out of headroom or floor length. In a 40HC, the extra height and length give you room for roughly twenty-four to thirty assembled units, depending on whether you double-stack lighter models or leave single-layer spacing for heavier ones.
Switch to knock-down packing, and the math changes dramatically. Uprights lay flat, guide rails bundle together, and weight stack plates nest into dedicated crates. The same 40HC that held thirty assembled units can accommodate forty or more KD-packed machines — a volume increase that is hard to ignore on paper.
But here is where the container loading configuration gets tricky: weight. A fully assembled commercial multi-function Smith machine with integrated selectorized weight stacks can weigh several hundred kilograms each. Load thirty of them into a 40HC and you may exceed the maximum gross weight well before you fill the cubic space. I have seen container loading configurations where the floor was only partially covered, yet the scale ticket at the depot showed the box was already at its payload limit. [NEED_CITE: maximum payload weight limits for 20GP, 40GP, and 40HC per ISO container classification]
A distributor in Southeast Asia learned this the hard way. They ordered a full 40HC of heavy-duty multi-function Smith machines for a gym chain project. The container loading configuration plan called for thirty units based on volume alone. At the weighing station before departure, the load was flagged as overweight. Five units had to be pulled, the container re-stuffed, and a separate less-than-container-load shipment arranged for the remainder — at a per-unit freight cost that wiped out the volume discount they had negotiated.
The takeaway is that container loading configuration for Smith machines is always a weight-first calculation, then a volume optimization within that weight envelope.
What Are the Key Factors in Smith Machine Container Loading Configuration?
Four factors determine whether your container loading configuration will arrive intact, on budget, and through customs without incident: base footprint dimensions, removable component strategy, weight distribution across the container floor, and destination port axle load regulations.
Let me walk through each one, because skipping any of them is how cargo claims and port fines happen.
Base footprint and door aperture compatibility. Every multi-function Smith machine has a base frame that defines its floor footprint. Before you finalize a container loading configuration, compare that footprint against the internal width and door opening of the container variant you are shipping in. A 40HC door opening is wider than a 20GP, but not by a huge margin. If your widest model exceeds the door aperture by even a small amount, you cannot roll it in on a pallet — it must be tilted, angled, or partially disassembled at the door. Each of those options adds time, risk, and cost. [NEED_CITE: standard container door aperture widths versus common commercial gym equipment base dimensions]
Removable component strategy. Most multi-function Smith machines come with detachable elements: J-hooks, safety spotter arms, weight horn posts, cable pulley housings, and accessory brackets. The instinct is to remove everything that bolts off, pack the small parts separately, and load the main frame. In practice, this creates a secondary problem. Small components in separate cartons are far more likely to go missing during transit or get mixed up when multiple SKUs share a container. I have opened containers where every Smith machine had its safety arms, but they belonged to three different models. The re-packing and re-matching labor at destination cost the buyer more than the freight savings from the extra units squeezed in. [NEED_CITE: ISTA packaging test standards for fitness equipment component retention during transit]
A better approach is to remove only the components that genuinely exceed the door aperture or create stacking interference, keep model-specific accessories factory-bagged and tag-tied to the main frame, and document exactly what was removed and where it is packed. This keeps the container loading configuration efficient without creating a parts-reconciliation nightmare at the other end.
Weight distribution across the container floor. This is where many first-time importers stumble. You cannot simply load Smith machines from the front of the container to the back in a single block. The center of gravity must sit roughly at the midpoint of the container’s longitudinal axis, and the load must be balanced laterally as well. Uneven weight distribution causes axle overload on one side of the chassis, which triggers rejection at weighbridges — both at origin and at destination. [NEED_CITE: axle load distribution requirements for road transport of loaded shipping containers]
The practical method is to alternate heavy units left and right, keep the densest machines near the center of the container floor, and use lighter KD-packed crates or accessory boxes to fill the nose and tail. Steel strapping and corner protectors secure the load against shift during ocean transit, but no amount of strapping fixes a fundamentally unbalanced floor plan.
Destination port axle load regulations. Different countries enforce different maximum axle weights for container chassis on public roads. Some ports in the Middle East and Latin America have strict single-axle limits that are lower than the standard gross weight of a fully loaded 40HC. If your container loading configuration puts the heaviest machines directly over one axle, the truck may be turned away at the port gate until the load is reworked — or you pay a premium for a tri-axle chassis. [NEED_CITE: destination-country axle load regulations affecting container transport from major ports]
A buyer in Latin America discovered this when their 40HC of multi-function Smith machines was held at the port because the weight sat too far forward. The container loading configuration had placed all the heavy assembled units in the first half of the box to maximize count, leaving the rear filled with lightweight accessory crates. The forward axle was overloaded by a noticeable margin. The fix was to pull the container back into the yard, redistribute six units toward the rear, and re-seal — a delay that cost more in demurrage than the extra units were worth.
Knock-Down vs Fully Assembled: Which Packing Method Saves More for Bulk Orders?
Knock-down packing increases the number of multi-function Smith machines per container by a substantial margin — but the real cost comparison must include destination assembly labor, tooling, quality inspection after reassembly, and the risk of missing or damaged small parts.
On paper, knock-down packing wins the volume argument every time. When uprights lay flat, guide rails bundle, and weight plates stack separately, you eliminate the dead air space that assembled units carry above and between frames. A container loading configuration based on KD packing can fit noticeably more units than the same container loaded with assembled machines — often a volume increase large enough to shift the per-unit freight cost meaningfully downward.
But freight cost is only one line item in the total landed cost equation.
Consider what happens when those KD-packed machines arrive at destination. Every unit must be uncrated, identified, matched with its correct hardware pack, assembled on a flat surface, aligned, leveled, and function-tested. That process requires trained technicians, assembly space, proper tools, and time. In markets where skilled gym equipment assembly labor is readily available and affordable, the added cost may be modest. In markets where labor is expensive or where qualified technicians are scarce, the assembly cost per unit can climb steeply enough to offset the freight savings. [NEED_CITE: comparative landed cost analysis framework for KD versus assembled fitness equipment imports]
I worked with a commercial gym chain buyer in the Middle East who ran the numbers both ways for a large multi-gym rollout. The KD-packed container loading configuration allowed them to ship more machines per container and reduce the total number of containers needed. But when they added the assembly labor cost, the quality inspection cost for each reassembled unit, and the cost of a few warranty claims traced back to assembly errors, the total landed cost was nearly identical to shipping assembled. The deciding factor turned out to be timeline — KD packing added weeks to the project schedule because assembly could not begin until all containers arrived and were unpacked.
There is also the small-parts problem I mentioned earlier. When components are separated for KD packing, the risk of loss or mix-up rises. A missing set of linear bearing cartridges or a mismatched cable pulley bracket means the machine is non-functional until replacement parts ship — which can take weeks if the supplier does not hold buffer stock.
The practical recommendation is this: for buyers with established assembly infrastructure and affordable skilled labor, KD packing in the container loading configuration delivers real freight savings. For buyers outfitting a limited number of locations, or operating in markets where assembly labor is costly or hard to source, fully assembled packing with selective removal of only the most space-consuming attachments often delivers a lower total landed cost and a faster project timeline.
How to Avoid Common Loading Mistakes That Cause Damage or Customs Penalties?
The three most common container loading configuration failures for multi-function Smith machines are overweight beyond payload or axle limits, poor weight distribution causing chassis imbalance, and inadequate load securing leading to cargo shift and frame damage during ocean transit.
Let me address each one with the kind of detail that only comes from watching these mistakes happen in real time.
Overweight beyond payload or axle limits. Every container has a maximum payload rating — the difference between its tare weight and its maximum gross weight. A 40HC typically allows a higher payload than a 20GP, but not proportionally higher than its volume increase. When importers focus only on how many Smith machines fit by volume, they routinely overshoot the weight limit. The consequence is not just a rejected container at the depot — it is potential fines at destination if the overweight box makes it onto a truck and gets caught at a roadside weigh station. [NEED_CITE: international container weight verification regulations under SOLAS VGM requirements]
The fix is straightforward: calculate the total loaded weight of every SKU in the container loading configuration before finalizing the packing plan, and compare it against both the container payload limit and the destination-country road weight restrictions. Leave a margin — do not plan to the absolute maximum.
Poor weight distribution causing chassis imbalance. I covered this in the previous section, but it bears repeating because it is the single most common reason for port delays on gym equipment shipments. The container loading configuration must place the center of gravity at the longitudinal midpoint and balance the load laterally. Heavy assembled Smith machines should alternate left and right, with the densest units near the center of the floor. Lightweight KD crates and accessory boxes fill the extremities. [NEED_CITE: container weight distribution best practices for road transport compliance]
Inadequate load securing leading to cargo shift. Ocean transit subjects containers to rolling, pitching, and sudden lateral forces. A multi-function Smith machine is a heavy, rigid structure with a high center of gravity when assembled. If it is not secured properly, it will shift — and when it shifts, it damages itself, adjacent units, and potentially the container walls.
The correct securing method for a container loading configuration with assembled Smith machines involves steel strapping anchored to the container’s internal lashing points, with heavy-duty corner protectors on every upright frame to prevent strap cut-through. Nylon belts alone are not sufficient for the weight and rigidity of commercial Smith machines — they stretch under load and lose tension over a multi-week ocean voyage. Between units, use timber bracing or inflatable dunnage bags to prevent lateral movement. [NEED_CITE: cargo securing standards for heavy gym equipment in maritime container transport]
A buyer in North America received a container where the Smith machines had shifted noticeably during transit. The steel straps had been used, but without corner protectors — the sharp edges of the upright frames had cut through the straps under rolling forces, releasing the load. Two machines had collapsed against each other, bending guide rails and damaging linear bearing housings. The repair cost and replacement parts took weeks to resolve and delayed the gym opening.
What Documentation and Loading Plans Should Buyers Request from Suppliers?
Professional suppliers should provide a detailed container loading diagram, a weight distribution calculation sheet, and pre-shipment loading photographs — and buyers should treat these documents as non-negotiable deliverables before the container doors seal.
Too many importers treat the container loading configuration as the supplier’s internal problem and only discover issues when the container arrives at destination. By then, any mistakes are expensive to fix.
A proper container loading plan document should include:
- A scaled top-view and side-view diagram showing exactly how many units of each SKU are loaded, their positions within the container, and the orientation of each unit.
- A weight distribution sheet calculating the total loaded weight, the center of gravity position along the longitudinal and lateral axes, and confirmation that the load falls within both the container payload limit and the destination port’s axle load regulations.
- A packing list cross-referenced to the loading diagram, showing which cartons or crates are in which position, and documenting any removable components and their storage locations within the container.
- Pre-shipment photographs taken at multiple stages — empty container inspection, first layer loaded, mid-load, fully loaded before securing, and fully secured before door closure. These photos serve as evidence of condition and configuration at the point of origin.
At Bick, we have made this documentation package a standard part of our bulk order process for multi-function Smith machines and all other commercial gym equipment. Every container loading configuration is reviewed against the destination port’s known weight restrictions, the loading is supervised by our quality team, and the full photo set plus weight distribution sheet is shared with the buyer before the container is sealed. It is not an extra service — it is the baseline for professional export handling.
Buyers who request and review these documents before shipment catch configuration errors while the container is still at the factory, where corrections cost hours rather than thousands of dollars in demurrage, rework, and delay.
Conclusion
A well-engineered container loading configuration for multi-function Smith machines protects your cargo, your budget, and your project timeline — but only if weight, not volume, drives the plan.
Start with destination port weight restrictions, then optimize unit count within that weight envelope. Choose knock-down or assembled packing based on total landed cost, not freight cost alone. Secure the load with steel strapping and corner protection, not nylon belts. And demand a full loading plan with diagrams, weight calculations, and photos before the doors close.