
Container Loading Configuration for Power Rack Bulk Orders
Most buyers think loading a container is just about stuffing as many units as possible. The real bottleneck is stacking geometry, weight distribution, and frame disassembly — not the container size itself.
A well-planned power rack container loading configuration can fit substantially more units per shipment by disassembling frames into flat-packed components, distributing weight evenly across the container floor, and matching rack dimensions to the exact internal measurements of 20GP, 40GP, or 40HQ containers — avoiding overweight rejection at port and eliminating wasted cubic space.
I still remember a shipment bound for Dubai a few years back. A gym chain in the Middle East ordered a full set of strength equipment — power racks, cable crossovers, plate-loaded machines — all in one container. Nobody ran a proper power rack container loading configuration before sealing the doors. When the container arrived at Jebel Ali, the weight was concentrated on one side, several uprights were bent, and the accessories had crushed the flooring boxes underneath. The buyer had to unload everything, re-sort, and reload into smaller batches for distribution to multiple gym sites. The extra handling fees and local trucking costs ate into a significant chunk of the profit margin they had projected for that order. [NEED_CITE: common causes of cargo damage in heavy equipment container shipments]
Since then, I have ma*ding configuration before a single bolt goes into the box. The internal dimensions of a standard dry container, the gross weight of each rack model, the stacking orientation of disassembled frames — all of it has to be calculated in advance. Below is what I have learned from years of loading commercial fitness equipment at Qingdao and Rizhao ports.
Let me walk you through the key decisions that determine whether your shipment arrives intact, on budget, and without surprises at the destination port.
How Many Power Racks Can You Fit in a 20ft/40ft Container?
The answer depends entirely on whether the racks ship assembled or knocked down — and the difference in unit count is dramatic.
A standard 20GP container has an internal length of approximately 5.9 meters, a width of 2.35 meters, and a height of 2.39 meters. A 40GP extends to about 12.03 meters in length, while a 40HQ adds extra height at 2.69 meters. [NEED_CITE: standard ISO container internal dimensions per ISO 668] These measurements define the outer boundary of your power rack container loading configuration.
When a power rack ships fully assembled, the footprint is dictated by its base dimensions — typically around 1.2 meters by 1.2 meters for a standard half-rack, and up to 1.5 meters by 1.5 meters or larger for a full cage with pull-up bars and storage pegs. In a 20GP, you might fit only a small number of assembled full-cage units before you run out of floor space. Stack them two high if the height allows, and you double the count — but only if the weight stays within the container’s maximum payload limit.
Now consider the same racks disassembled. The uprights, cross-members, J-hooks, safety arms, and weight storage horns can be separated, bundled, and stacked flat. In this configuration, the same 20GP can hold a significantly larger number of rack sets because you are no longer constrained by the assembled footprint. The uprights lie flat in layers, separated by cardboard or foam spacers to prevent scratching. Smaller components fill the gaps between bundles. [NEED_CITE: best practices for flat-packing heavy steel fitness equipment for export]
For a 40HQ, the extra height gives you another full layer of flat-packed uprights compared to a 40GP. That additional layer often translates into a noticeably higher unit count per container — which directly lowers the per-unit freight cost.
However, there is a trade-off. Disassembled racks require reassembly at the destination. If your buyer is a distributor who plans to resell to individual gym owners, flat-packing makes sense — the end user will assemble anyway. If the buyer is a large commercial gym chain with in-house installation teams, they may prefer partially assembled units to save labor time on-site. The power rack container loading configuration must reflect this decision before production begins.
What Are the Common Overweight and Space-Waste Mistakes?
The two most frequent errors are ignoring the per-container weight limit set by the shipping line on a specific trade lane, and failing to disassemble rack frames that could otherwise be flat-packed.
Commercial power racks are heavy. A single full-cage unit with all attachments can weigh well over a hundred kilograms. Steel is dense. When you multiply that by dozens of units, the total payload approaches the container’s structural limit quickly — often before you have used up all the available cubic space.
Each shipping line sets its own weight restrictions per route, and these limits vary by origin port, destination port, and even by the type of chassis used for inland transport. [NEED_CITE: vessel weight restrictions and road weight limits by major trade lanes] A 20GP heading to certain ports in West Africa, for example, may face stricter weight enforcement than one going to a well-equipped port in Southeast Asia. Exceeding the limit means the container gets rejected at the terminal — or worse, it gets loaded onto the vessel and then flagged at the destination, triggering fines and forced unstuffing.
I once worked with a distributor in West Africa who ordered a mixed container of power racks, benches, and dumbbell sets. The racks were loaded fully assembled because the buyer assumed reassembly labor at the destination would be too expensive. The total weight pushed past the shipping line’s limit for that route. The container was held at the loading port for three days while we had to pull out several racks and redistribute them into a second, smaller shipment. The demurrage, the rebooking fees, and the extra trucking all added up to a mid-five-figure loss.
The second mistake — not disassembling — wastes space in a different way. An assembled rack traps a large volume of empty air inside its cage structure. That air cannot be used to carry other products. When you knock the rack down, the uprights stack tightly, and the void space between them can be filled with smaller items: J-cups, safety straps, band pegs, even boxed accessories from other product lines. This is where a thoughtful power rack container loading configuration turns wasted air into revenue-bearing cargo.
How Should Power Racks Be Stacked and Secured Inside the Container?
The golden rule is: heavy steel components on the bottom, centered along the container’s longitudinal axis, with smaller parts filling every remaining gap — and everything strapped or blocked to prevent shifting during ocean transit.
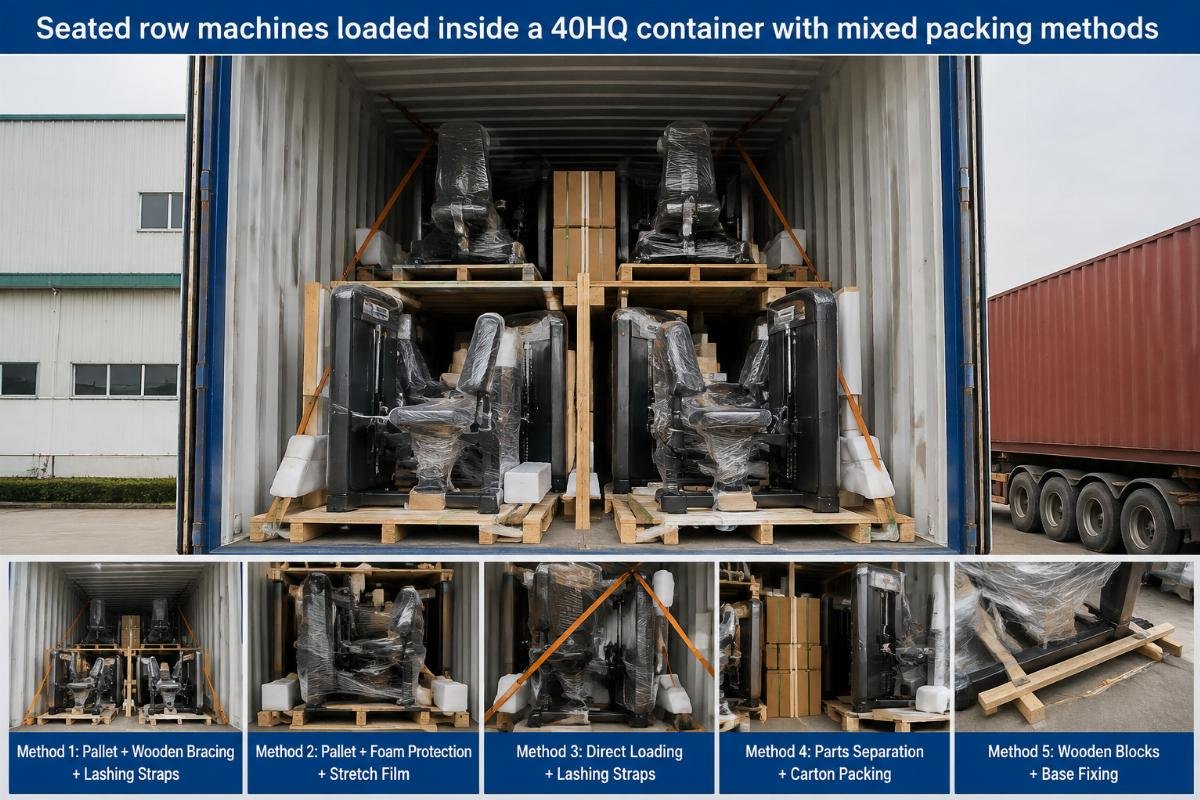
The loading sequence matters. Uprights and main frame members go in first, laid flat across the container floor in even layers. Each layer should be separated by protective material — corrugated cardboard sheets or EPE foam — to prevent metal-to-metal contact that causes paint chips and scratches. The bundle height should be kept uniform so that the next layer sits level. [NEED_CITE: cargo securing guidelines per CTU Code for heavy steel goods]
Once the main frame bundles reach a certain height, you begin placing accessory boxes on top and alongside. Weight plates, if included in the order, should be stacked separately in their own section — ideally near the center of the container’s floor to keep the center of gravity low and balanced. Barbells, if present, can be laid along the full length of the container on top of the flat-packed uprights, acting as a stabilizing layer.
The center of gravity is critical. If all the heavy rack components are loaded against one side wall, the container will be lopsided. During crane lifting at the port, an unevenly loaded container can swing dangerously. On a vessel, it creates asymmetric stress on the container’s corner castings. [NEED_CITE: center of gravity requirements for packed containers per IMO/ICS guidelines]
Securing is non-negotiable. Steel straps or heavy-duty nylon lashing belts should run across the top of each bundle, anchored to the container’s internal lashing rings. Wooden dunnage or inflatable bags can be wedged between bundles and the container walls to eliminate lateral movement. For long ocean voyages — say, from Qingdao to Lagos or Buenos Aires — the vessel encounters swells that cause containers to shift on deck. Without proper lashing, a heavy rack bundle can break through its cardboard separation, damage adjacent goods, and even puncture the container wall.
A buyer in South America once received a container where the internal lashing points had been ignored. The racks were simply pushed in and the doors closed. By the time the container reached Santos, the shifting had snapped two of the wooden braces, and a bundle of uprights had slid forward, crushing the boxes of cable attachments near the door. The insurance claim was approved, but the delay in getting replacement parts to the gym project cost the buyer several weeks of lost membership revenue.
Should You Choose 20GP, 40GP, or 40HQ for Power Rack Orders?
The choice is not simply "bigger is better" — it depends on total order volume, the weight-to-volume ratio of your specific rack models, and the inland transport conditions at the destination.
A 20GP is the right choice when the order is relatively small — perhaps a boutique studio outfitting or a single gym site that needs a handful of power racks plus some free weights. The lower ocean freight rate for a 20GP makes it economical for lighter, denser shipments where weight is the limiting factor rather than volume. If you are shipping mostly weight plates and barbells alongside a few racks, a 20GP may reach its weight limit long before it runs out of space.
A 40GP doubles the floor length. It makes sense when you have a larger quantity of flat-packed racks and need the room for multiple layers plus accessory fill. The per-unit freight cost drops noticeably compared to booking two 20GPs.
A 40HQ adds roughly 30 centimeters of interior height. That extra height allows one more layer of flat-packed uprights, which can translate into a meaningful increase in units per container. For buyers ordering large quantities of the same rack model, the 40HQ often delivers the lowest per-unit shipping cost.
But here is the counterintuitive part. In some destination regions, inland transport from the port to the final warehouse or gym site uses smaller trucks that cannot handle a 40HQ. The height restriction on certain roads, bridges, or warehouse doors may force the buyer to transfer the cargo to a smaller vehicle — adding cost and handling risk. In parts of East Africa and certain areas in the Middle East, I have seen buyers specifically request 20GP shipments because their local transport infrastructure simply cannot accommodate a 40HQ. [NEED_CITE: inland transport height and weight restrictions for container shipments in developing markets]
The power rack container loading configuration must therefore be planned in reverse — starting from the destination constraints and working backward to the container type, then to the packing method, and finally to the production schedule.
How to Request a Loading Plan Before Placing a Bulk Order?
Always ask your supplier for a detailed loading plan — including a diagram showing unit count, stacking orientation, weight distribution, and accessory placement — before you confirm a bulk order and wire any deposit.
A professional loading plan is not a guess. It is a calculated document that takes the exact external dimensions of the disassembled rack components, the internal dimensions of the chosen container type, the gross weight of each component, and the shipping line’s weight limit for the specific trade lane — and produces an optimized configuration. [NEED_CITE: elements of a professional container loading plan for heavy commercial equipment]
The plan should show:
- The number of complete rack sets that fit per container, broken down by component type (uprights, cross-members, accessories)
- The stacking orientation and layer count for each component bundle
- The total estimated weight and its distribution across the container floor
- The placement of accessory boxes and filler items in the remaining void spaces
- The lashing and dunnage strategy to secure the load
When I prepare a power rack container loading configuration for a buyer, I provide a diagram with top-view and side-view layouts, a component count table, and a weight summary. This allows the buyer to verify that the container will not exceed weight limits, that the unit count matches their cost projections, and that all ordered accessories are included in the shipment.
This step also opens the door to mixed-product consolidation. If the buyer needs power racks, adjustable benches, dumbbell sets, and rubber flooring for a complete gym fitout, all of these can be combined into a single container — or distributed across multiple containers in a way that maximizes space utilization and minimizes the total number of shipments. A rubber flooring roll, for example, can be placed on top of flat-packed rack uprights. Dumbbell sets can fill the gaps between bench frames. The power rack container loading configuration becomes a puzzle where every piece has a designated slot.
Requesting this plan upfront costs nothing and prevents costly mistakes downstream. A buyer who skips this step is essentially gambling with freight budgets, cargo safety, and project timelines.
Conclusion
A successful power rack container loading configuration is engineered before the first unit enters the container — not improvised at the loading dock. Disassembling frames for flat-packing, matching component dimensions to container internals, respecting weight limits per trade lane, and securing the load against ocean transit forces are the four pillars that determine whether your shipment arrives on budget and intact. Plan the load in reverse from destination constraints, demand a detailed loading diagram from your supplier before ordering, and treat every cubic meter and every kilogram as a variable worth optimizing.